Auntie Em's Crafts

Crafts, Quilts, Decor, And More

  • Home
  • BLOG POSTS
    • Sewing
      • Quilting
      • Tutorials & Patterns
      • Holiday Sewing
    • Machine Embroidery
    • Crafting
      • Craft Show
      • Holiday Crafting
    • Decorating
    • Cooking
    • In-Vitro
  • FABRIC SHOP
  • SEWING & EMBROIDERY SHOP
  • Embroidery Services
  • Emily @ Simply Notable
  • Printables
    • DIY Online Image Size Chart
    • Quilting Charts & Measurements
  • About

Mini Granny Square Tutorial

2015/10/26 By: Emily8 Comments

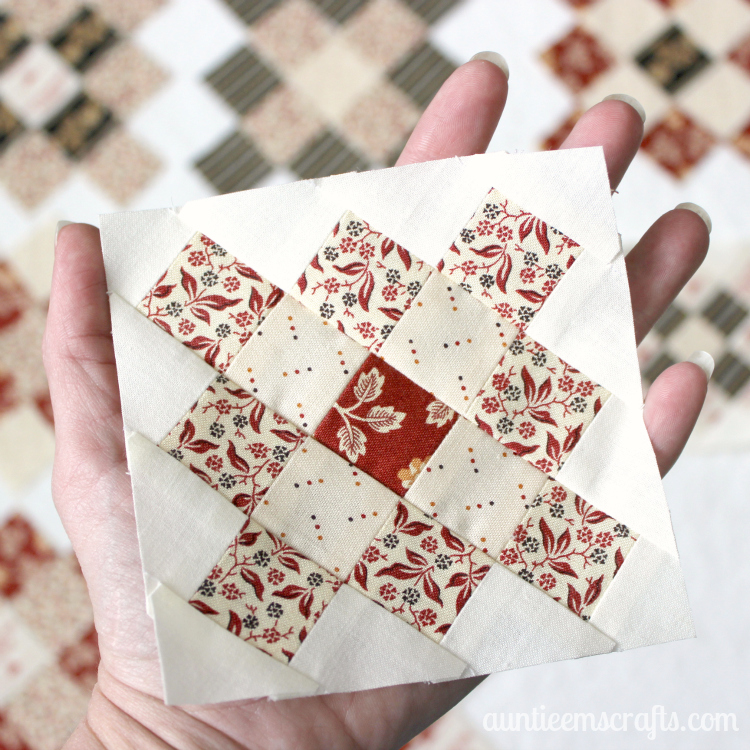
I have been in love with the Granny Square block for a long time now. It wasn’t until Andover Fabrics sent me a fat quarter bundle that I was brave enough to try it out.

Here is how to make a mini granny square that measures just 4″ finished!

Have you always wanted to make a mini granny square? Learn how to make a block that is just 4" finished! | AuntieEmsCrafts.com

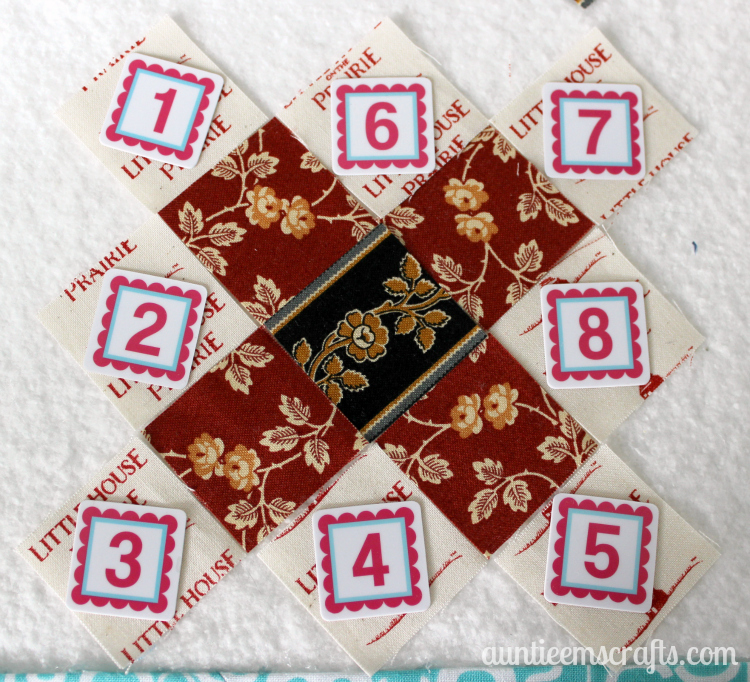
You will need the following 1.5″ squares cut:
1- center baby square
4- mama squares
8- granny squares
12- solid colored squares

Helpful tools:
– Use a Shape Cut ruler to cut these squares. It helps make accurate cuts and is especially helpful if you need to fussy cut the fabric!
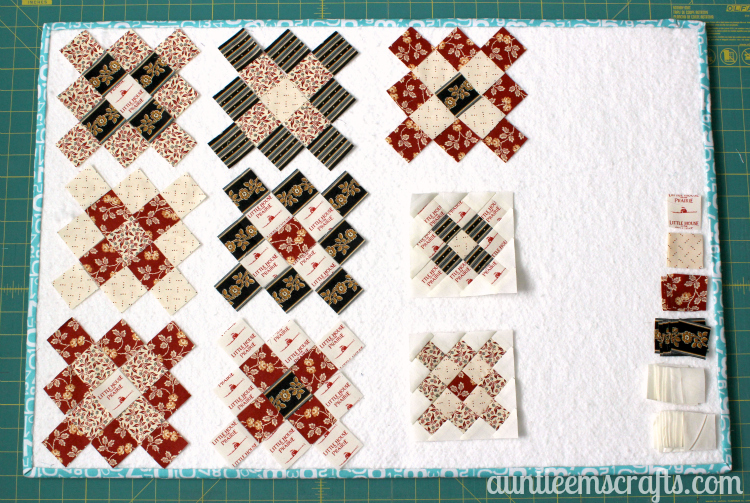
– Use a design board or portable design board to arrange the fabrics to your liking. Lori Holt has a tutorial for her portable design boards on her blog. This portable version is great for working with these little blocks. Just don’t accidentally tip over your board like I did. :-\

Have you always wanted to make a mini granny square? Learn how to make a block that is just 4" finished! | AuntieEmsCrafts.com

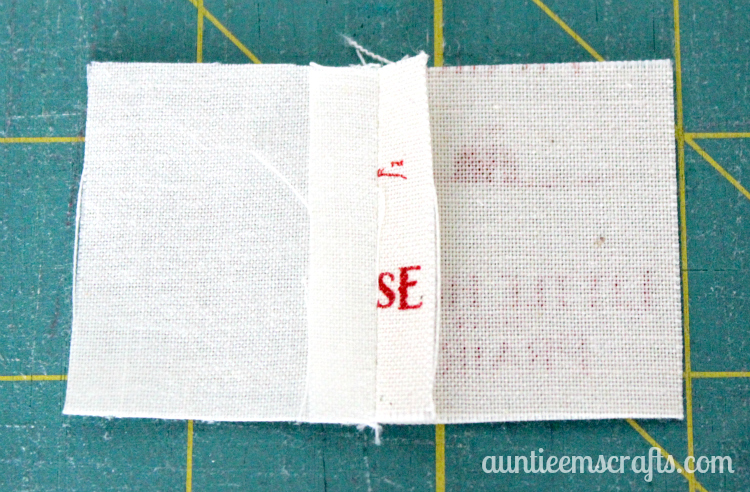
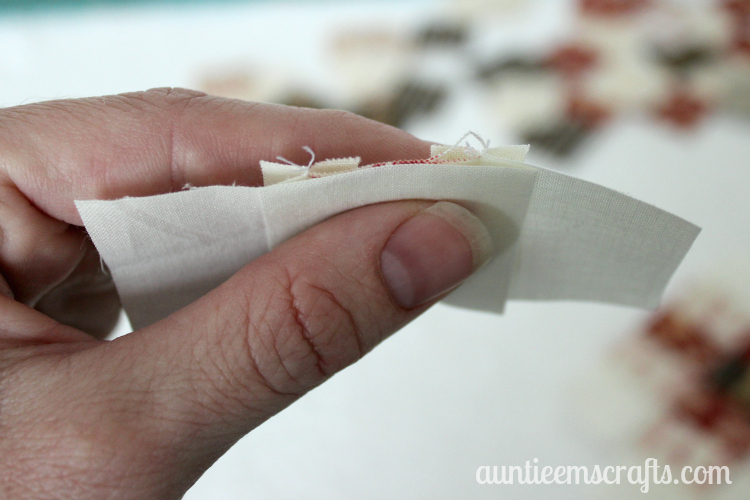
 I used some alphabitties to help illustrate where to sew.  At this point, you should have your solid squares laid out too. You will sew a solid square to the left of blocks 1-5 and to the right of blocks 6-8.

Have you always wanted to make a mini granny square? Learn how to make a block that is just 4" finished! | AuntieEmsCrafts.com

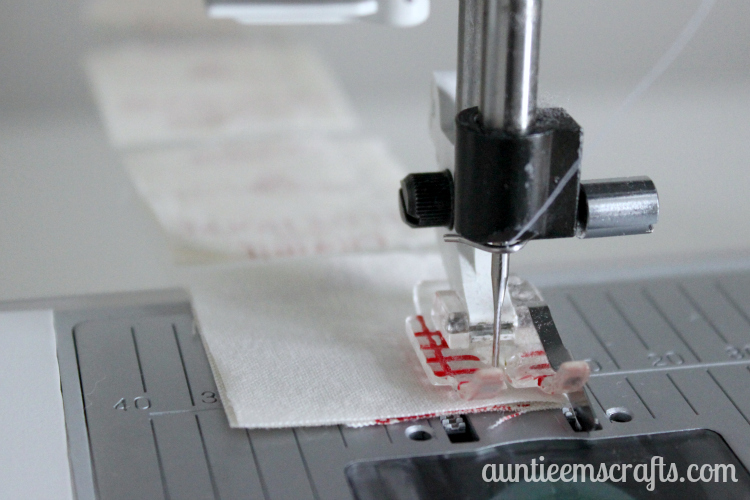
You’ll want to use a smaller stitch than normal since the pieces are so small. My normal stitch is a 2.5 so I set my machine to 1.5. I used a 1/4″ piecing foot and chain pieced the blocks.

Have you always wanted to make a mini granny square? Learn how to make a block that is just 4" finished! | AuntieEmsCrafts.com

Iron your seams open for each block set.

Have you always wanted to make a mini granny square? Learn how to make a block that is just 4" finished! | AuntieEmsCrafts.com

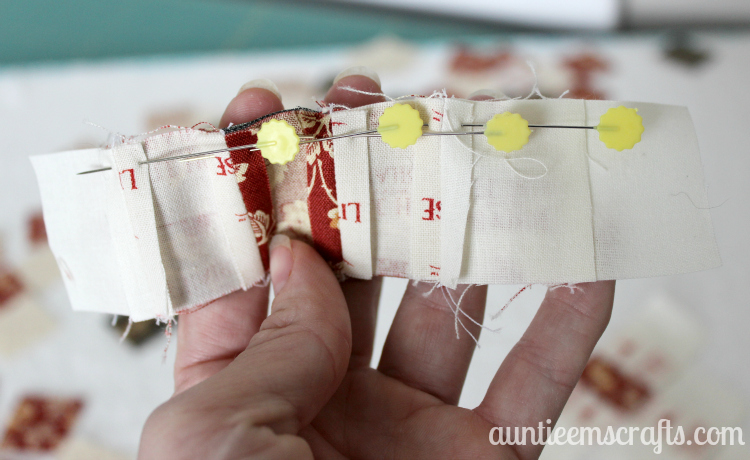
Sew blocks 1-5 to the block on its left. Iron seams open.

Have you always wanted to make a mini granny square? Learn how to make a block that is just 4" finished! | AuntieEmsCrafts.com

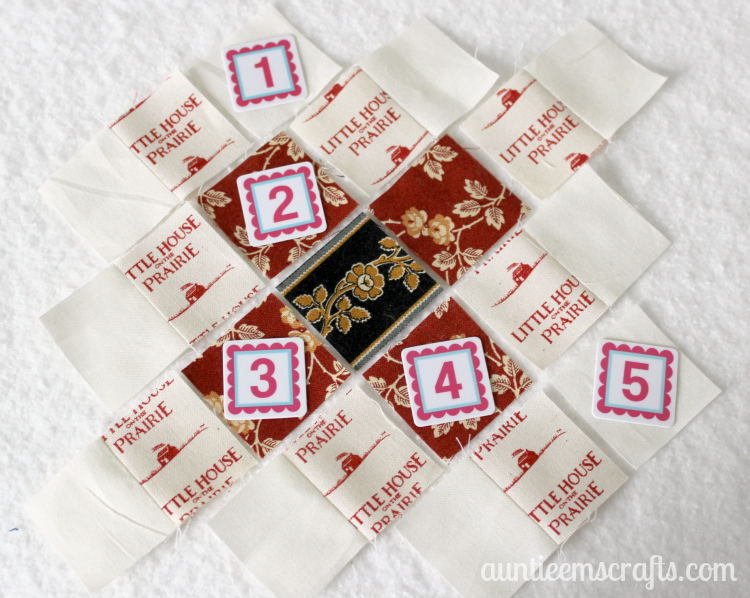
Repeat this process for 1-4, then 1 as shown.

Have you always wanted to make a mini granny square? Learn how to make a block that is just 4" finished! | AuntieEmsCrafts.com

Have you always wanted to make a mini granny square? Learn how to make a block that is just 4" finished! | AuntieEmsCrafts.com

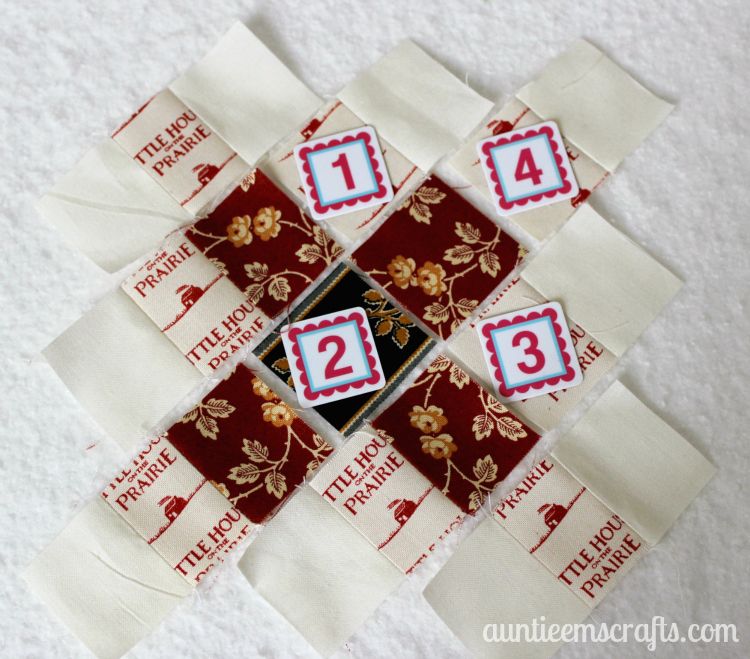
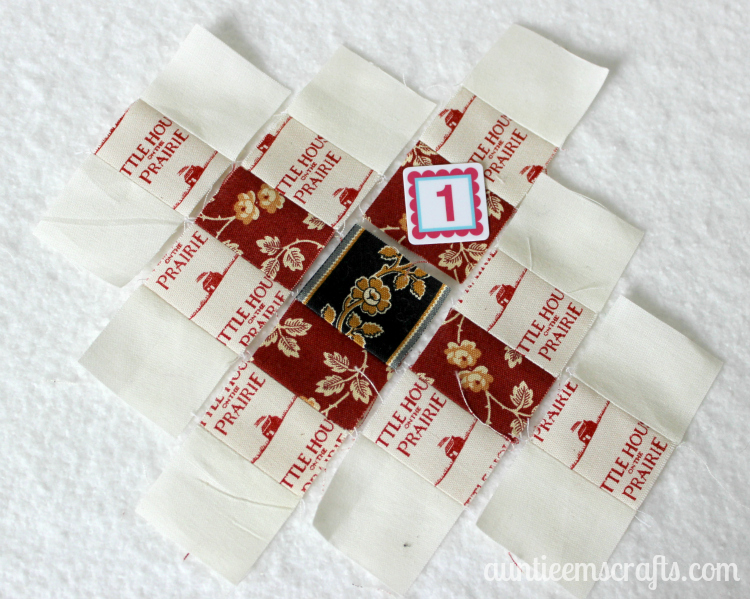
The underside should look like this, with all seams open.

Have you always wanted to make a mini granny square? Learn how to make a block that is just 4" finished! | AuntieEmsCrafts.com

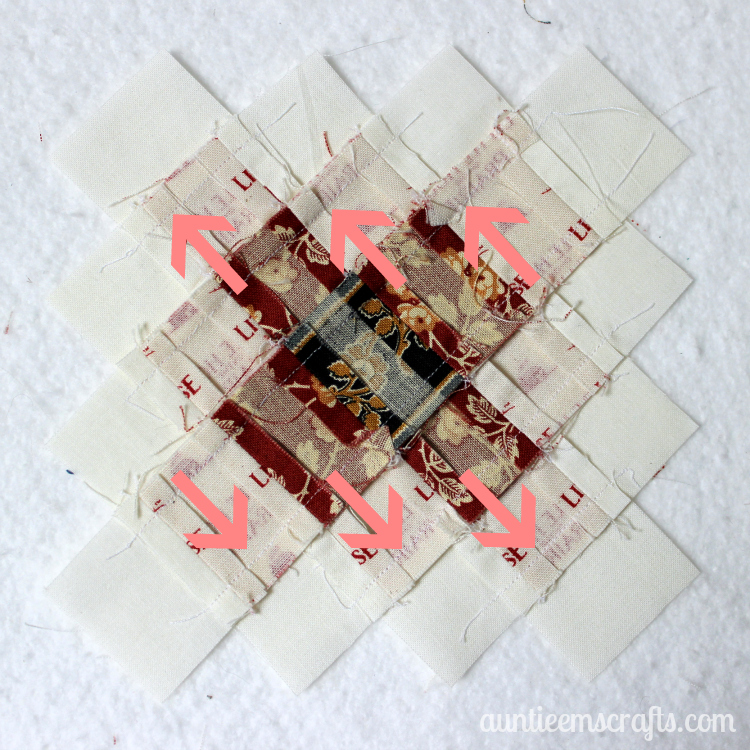
Now you will add the top left and bottom right squares. Line the block up with the ironed out seam. This time you will iron towards the added block rather than ironing the seam open.

Have you always wanted to make a mini granny square? Learn how to make a block that is just 4" finished! | AuntieEmsCrafts.com

Then you will starting sewing the rows together. Pin the rows together at the joints. Iron the the sets away from the center row, towards the corner blocks.
Have you always wanted to make a mini granny square? Learn how to make a block that is just 4" finished! | AuntieEmsCrafts.com

Once assembled, the underside should look like this with seams ironed towards the corners. This will help the rows lay flat.

Have you always wanted to make a mini granny square? Learn how to make a block that is just 4" finished! | AuntieEmsCrafts.com

At your cutting mat, line up a 45 degree line with the center blocks so that you are also 1/4″ past the  granny blocks. When you are sure it is all lined up properly cut off the excess fabric.

Have you always wanted to make a mini granny square? Learn how to make a block that is just 4" finished! | AuntieEmsCrafts.com

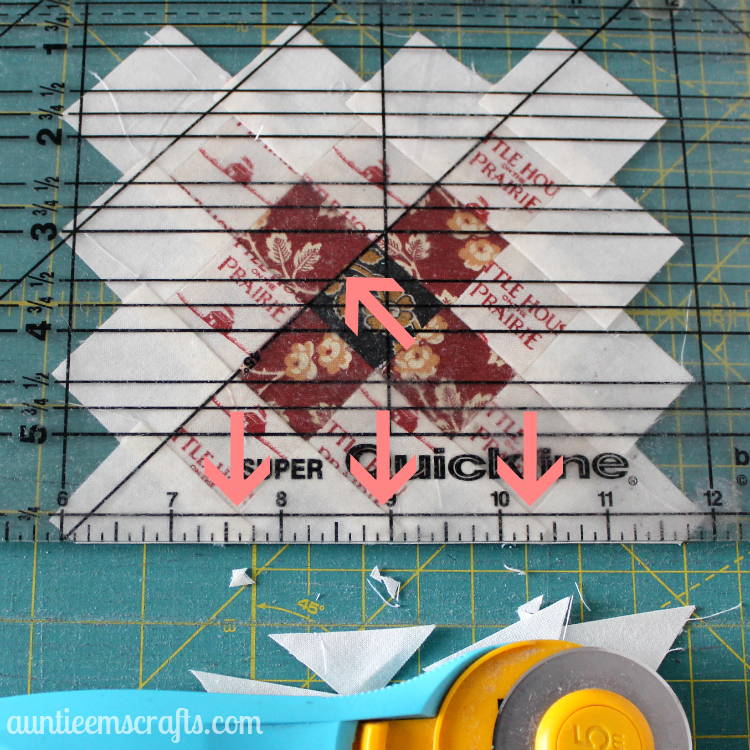
Continue turning the granny block until all four sides have been trimmed. The granny block should measure 4.5″ x 4.5″, so 4″ finished. Isn’t that adorable?!

Have you always wanted to make a mini granny square? Learn how to make a block that is just 4" finished! | AuntieEmsCrafts.com

Well, now I am hooked. I already have several other blocks made in different fabrics. Here are some other ways you can use them: a pincushion, an ornament, and a mini quilt!

Auntie Em

Comments

  1. 1

    Milagros Fernandez says

    2015/12/02 at 1:10 pm

    Gracias por compartir y es una magnifica idea para aprovechar los pequeños restos. Felicitaciones y Feliz Navidad!

    Reply
  2. 2

    Sharyn day says

    2015/12/08 at 3:18 pm

    Thank you for the tutorial. It will be perfect as one of the placemats I am making for my grandchildren. Cheers Sharyn

    Reply
  3. 3

    Carol thompson says

    2015/12/18 at 2:01 pm

    Carol
    This is such a traditional block, it is great to have a mini of it for various projects! Thank you very
    much for taking the time to post the tutorial for this little beauty! I know I will make at least two!

    Reply
  4. 4

    Ana Lucia Pereyra says

    2016/01/13 at 3:01 pm

    Muy lindo,para esos ministro que nos quedan

    Reply
  5. 5

    Sanlyn says

    2016/02/16 at 7:05 pm

    What is the width of the binding?
    I also love “Little House on the Prairie, it was one of the few programs I was allowed to watch when growing up. I am going to make this quilt with 1930’s prints for my niece and oriental fabrics for my mother (burgundy and yellow) and mother-in-law (purple and orange).

    Reply
    • 6

      Emily says

      2016/02/17 at 10:51 am

      Hi there! The width of the binding on the quilt was 2 1/2″.

      Reply
  6. 7

    Silvina says

    2016/06/20 at 12:49 pm

    Excelente vuestra explicaciones, muchas gracias y felicitaciones

    Reply

Trackbacks

  1. 50+ WAYS TO USE LITTLE HOUSE ON THE PRAIRIE® FABRICS says:
    2015/12/07 at 4:24 am

    […] Mini Granny Squares Tutorial by Auntie Ems Crafts    […]

    Reply

Leave a Reply Cancel reply

Your email address will not be published. Required fields are marked *

  • Email
  • Facebook
  • Flickr
  • Instagram
  • Pinterest
  • RSS

Welcome!

I love to go into my sewing room and make beautiful things in my free time. It truly is my happy place!

Search

Tags

baby bookmark chalk paint Christmas craft shows Create Room dogs DreamBox embroidery free gift infertility kids laminated cotton mug rug Pincushion pinwheel quilt rainbow recipes tutorial

My Family Blog

Simply Notable

Copyright © 2025 · Modern Blogger Pro Theme By, Pretty Darn Cute Design