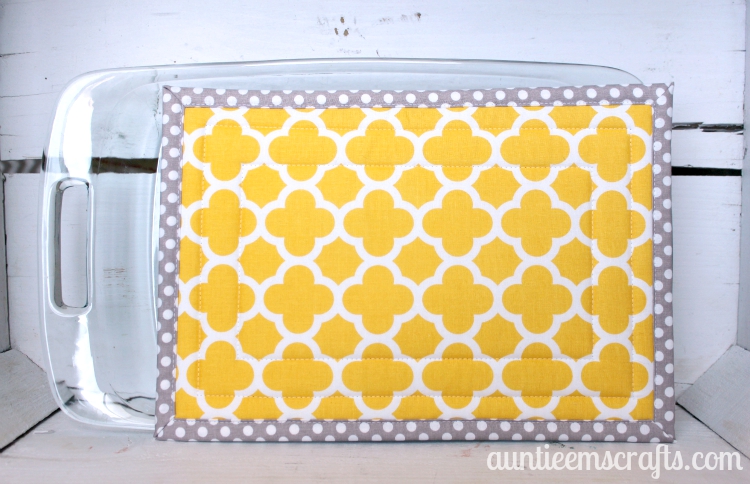
As promised in the Pyrex handle cover tutorial, here are the instructions for making your own large hot pad. It is perfect for protecting your dining table or counters from a hot casserole dish.
You will need:
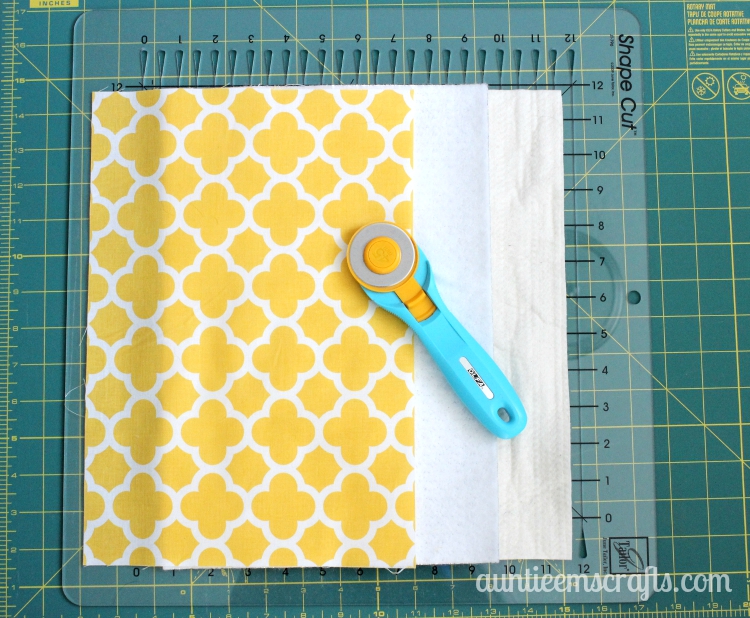
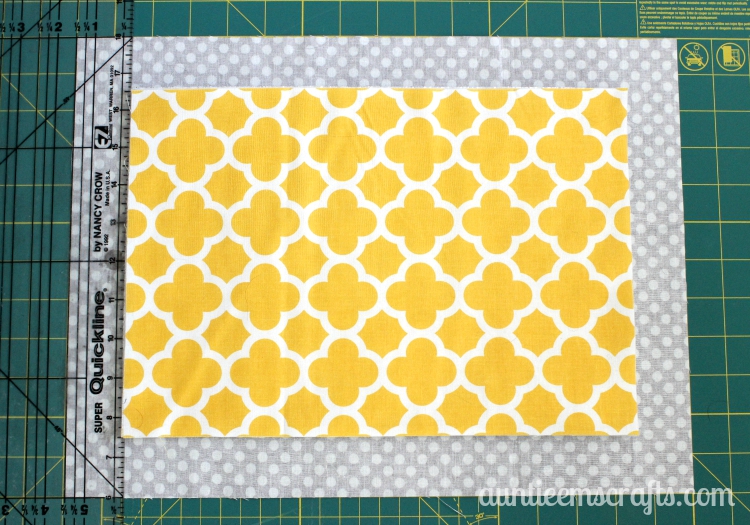
13×9″ batting
13×9″ Insul-Bright (or second layer of batting)
13×9″ fabric for the top
16×12″ fabric for the bottom.
Tools: Coordinating thread, sewing machine, walking foot, basting spray, water soluble or disappearing ink marker, acrylic rulers, cutting mat, rotary cutter, iron, ironing board, Wonder Clips, and scissors.
1. Start by cutting your batting, Insul-bright, and top fabric to size. I like to use my Shape Cut ruler, but a 6×24″ ruler will work as well.
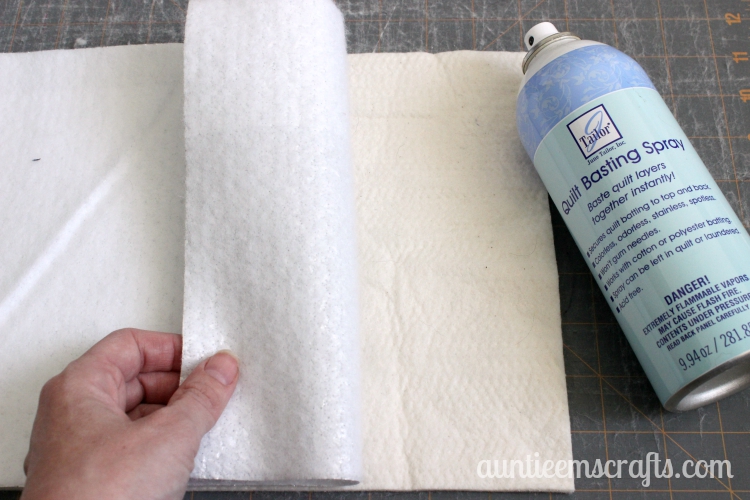
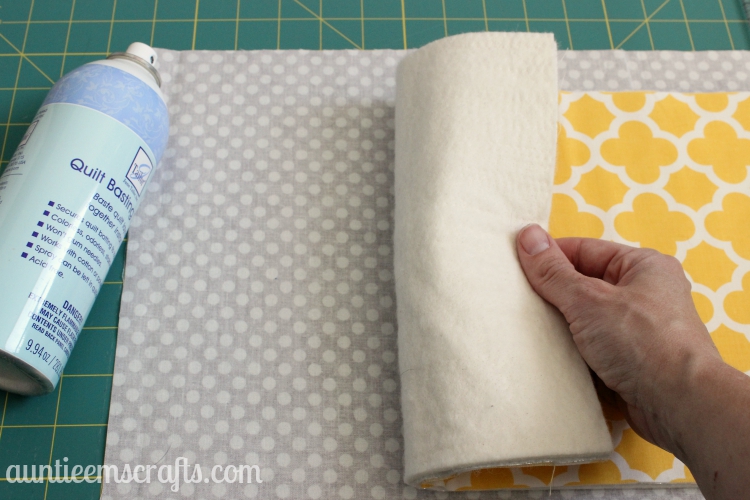
2. Use the basting spray to join the two inside layers. You can use two layers of batting, Insul-bright, or one of each. If you use one of each, put the Insul-bright on the top. I use an old cutting mat or cardboard when spraying to keep my good cutting mat clean. I also recommend using this mat for cutting the batting materials.
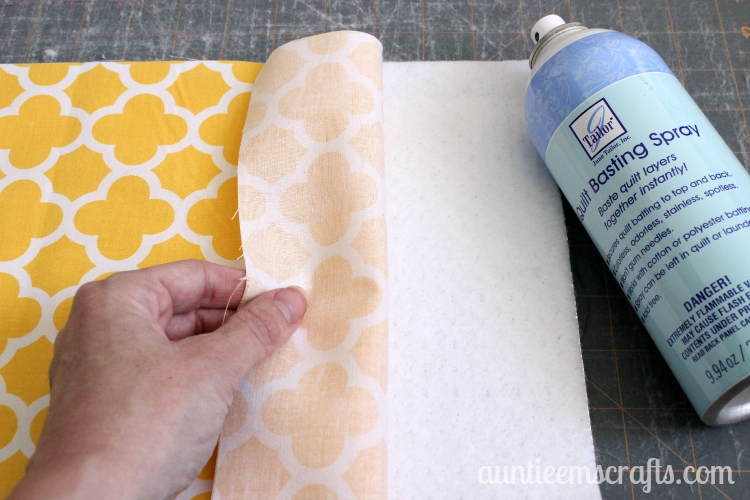
3. Join the top fabric and the inside layers with the basting spray. Trim around the edges of the batting, if necessary.
4. Set your bottom piece of fabric face down on your work space. Line your 6×24″ ruler on the short side of the bottom fabric at the 1.5″ mark. It is helpful to have the fabric centered on two lines on the top and bottom. Dry fit the top of the hot pad onto the bottom fabric. Center it so that it is 1.5″ from the top and bottom.
5. Lift one side of the top and spray the basting spray onto the batting. Repeat for the other side. Flip the whole hot pad over to smooth out any winkles.
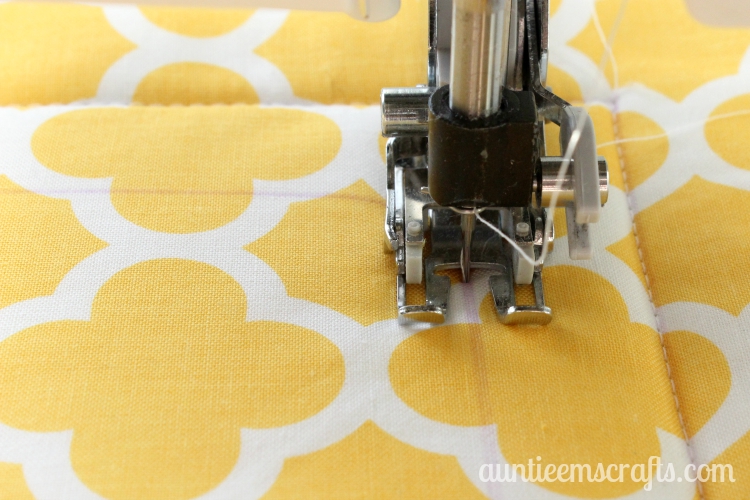
6. Use your 6×24″ ruler and water soluble pen to create two boxes on the top piece. Mark one 1″ away from the edge, and the other 2″ away (or mark it for your desired method for quilting.) Do not use a chalk marker, because it is difficult to later remove the markings.
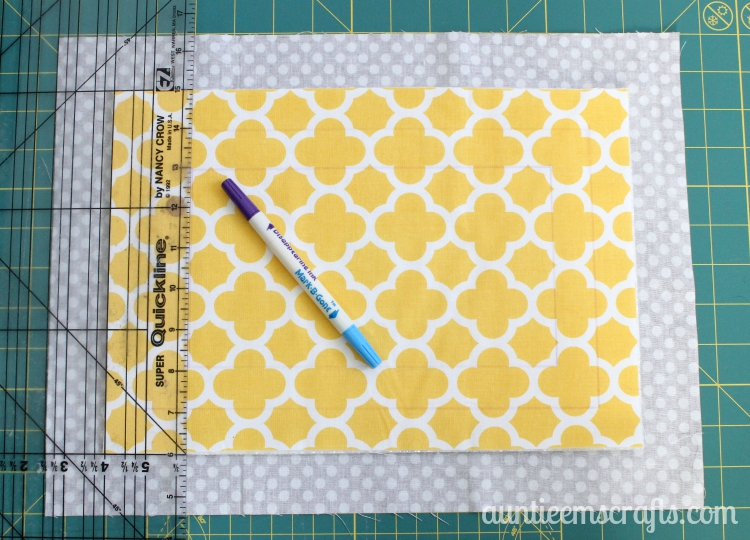
The purple side of my marker is a little difficult to see so here is a close up.
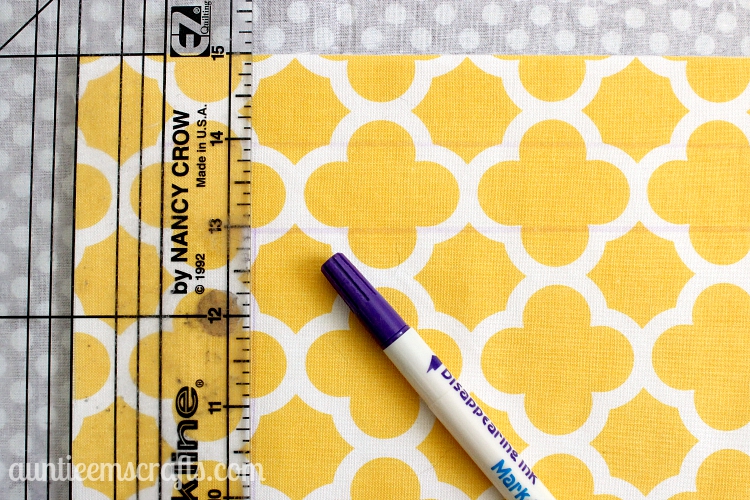
7. With your walking foot, sew directly onto the drawn lines. Don’t wait too long, or the lines will start disappearing! Fix the stitch or back stitch at the beginning and end of your rectangles.
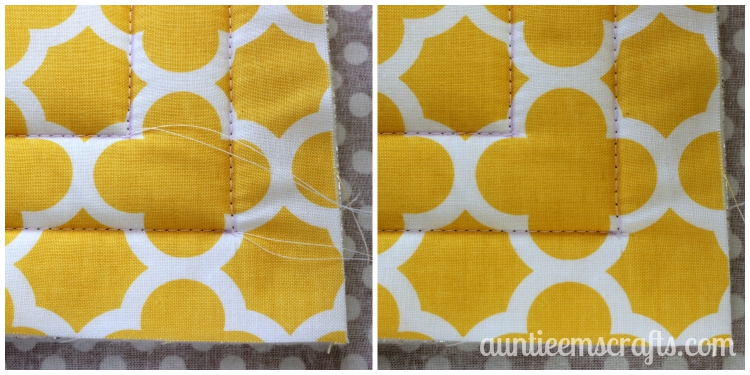
8. Tie the strings into a knot at the top and bottom sides of the hot pad. Clip the strings off, but be careful not to cut your knots off.
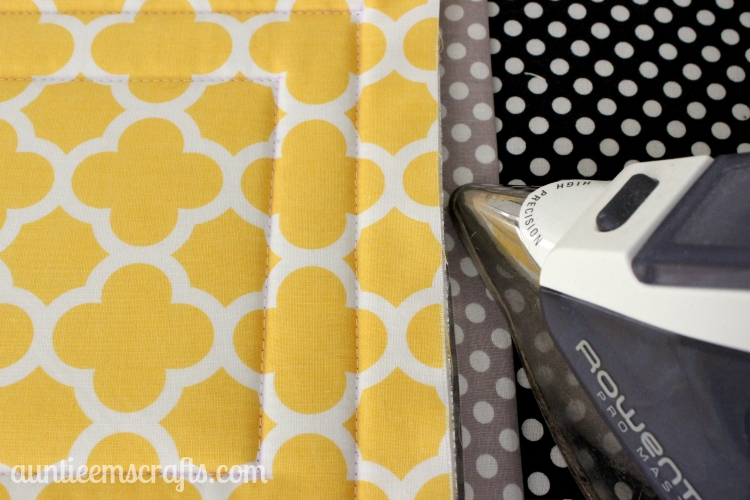
9. Starting on a long side, iron your backing fabric in half so that it makes a .75″ binding. Do as I say, not as I do! Starting on the long end is easier than the short end because of the clips you’ll use in step 10. 🙂 PS- Sorry to cause any confusion…. the black dot is my ironing board cover. I seem to have a thing for dots!
10. At the corner, clip a 1.5″ tall x .75″ wide rectangle out of the fabric. This is to help reduce bulk on the finished binding.
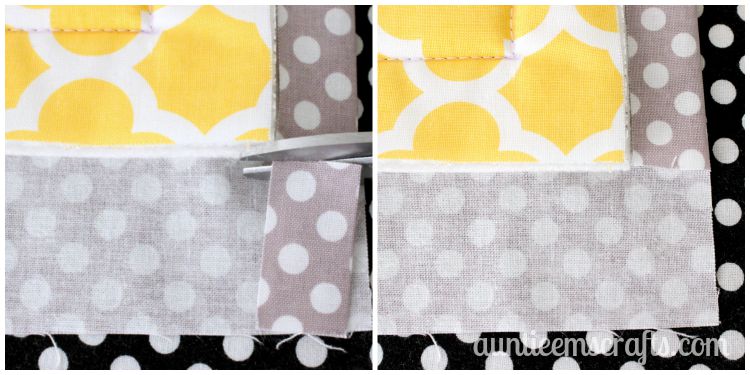
11. Turn the project so that the cut corner is now at the top right (photo 1). Fold the binding down onto the top fabric (photo 2). Pull the fabric down to create a triangle with the next side. Space the triangle slightly away from the edge (photo 3). Fold the side down on top of the triangle. Iron it even with the edge (photo 4). Start using the Wonder Clips every few inches to hold the binding in place.
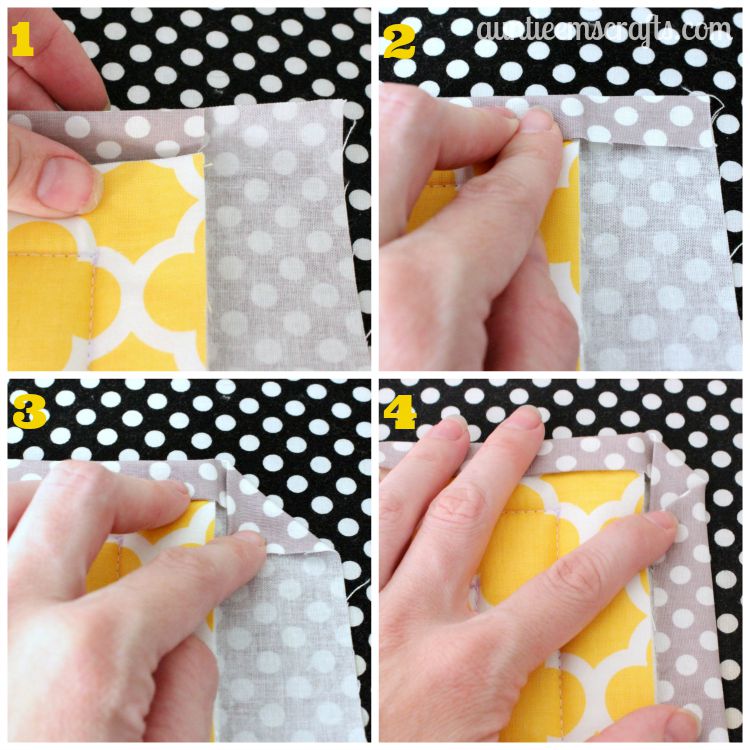
12. Continue clipping the excess corner fabric off, folding the corners, folding the binding, and placing the Wonder Clips every few inches all the way around.
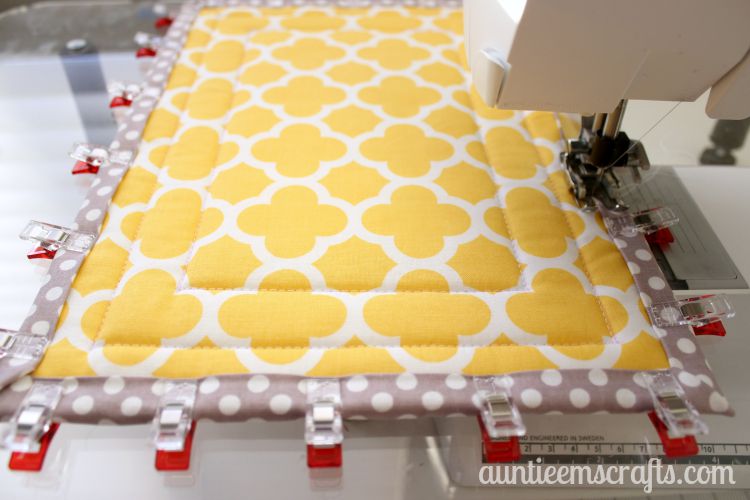
13. Sew the binding down, approx 1/8″ from the edge. Fix the stitch or back stitch at the beginning and end. Tie the strings into a knot at the top and bottom and clip the strings.
Ta-da! One large hot pad complete.
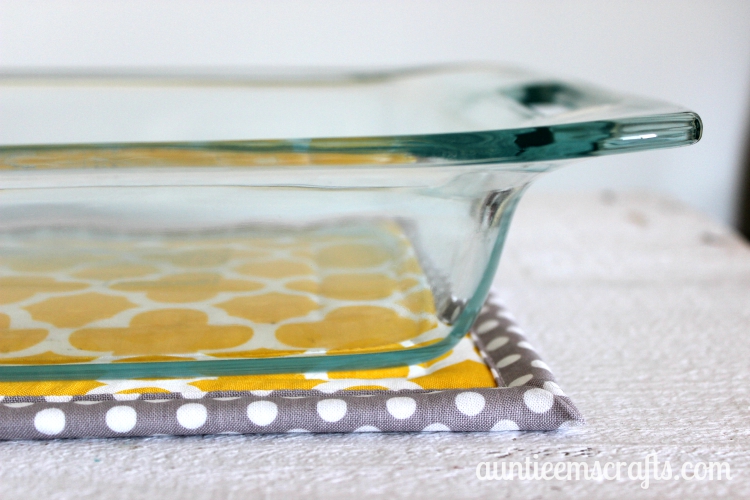
You can follow these same directions for a standard sized hot pad by cutting your fabric and batting to 8.5″ square and 11.5″ square for the bottom fabric.
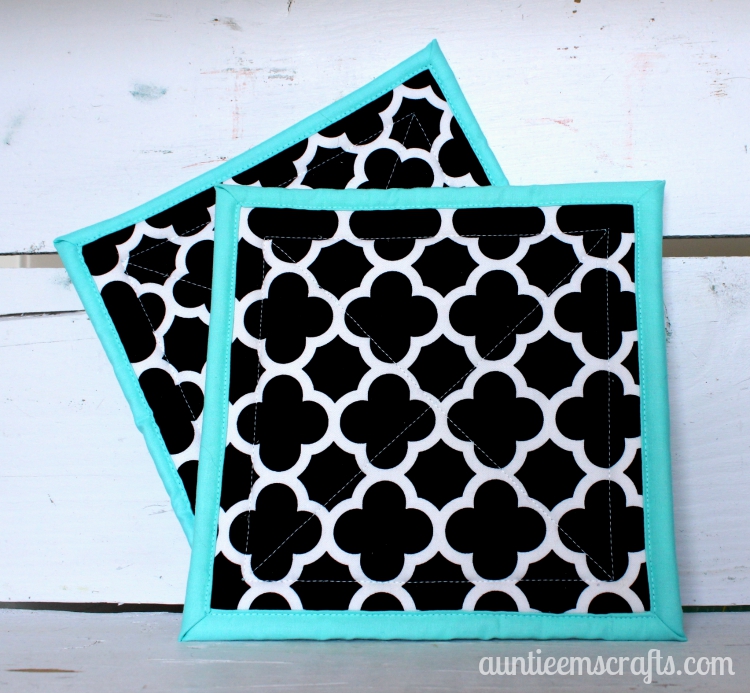
I like to make hot pad sets to give away as housewarming and Christmas gifts. These would also be great craft show fillers if you are an apron maker. You can view/purchase completed sets in my Auntie Em’s Crafts Etsy store. Some of the fabrics shown are available for purchase in my Auntie Em’s Crafts 2 Etsy store.
Notes: Since the fabrics and batting have not been pre-washed, you may want to use a color fixative such as Retayne or a Carbona color catcher. Wash the hot pads in cold water and dry on low or air dry. These will “poof up” like a quilt, so you may iron it as needed.
Enjoy!
![]()
PS- I have been asked for a printable version of this tutorial. It is available here.
Thank you for this easy to follow tutorial! I’m a novice at quilting and this project made it easy to do binding and may be my “go to” for binding smaller projects.
I love your hotpads! They are beautiful. How ironic that I was just telling my grandmother last night that I was going to make her some new ones, and then find the link to this page in my email this morning. Guess that’s my sign… Lol.
Excellent timing!
These are perfect and such a great gift idea! I love the possibilities with so many great fabrics to choose from. Thanks for your thorough tutorial.
You have no clue how many videos I have watched and tried on making the mitre corner. Found your directions and I am finally impressed how easy and near perfect my potholders turned out. Great directions
I’m glad you like the directions, Leslie. It is my go-to method now for mug rugs and hot pads.
What are mug rugs?
Just like a mini quilt that you put your coffee cup on or a snack. I also use a square one for my mouse pad.
I love this tutorial, so easy to follow, but my thread seems to keep breaking between the tension & needle. Could it be the glue? My needle seems sticky & I have it on large stich, but ends up small. I have never worked with the glue or insa brite. Do I need to let glue dry for a while? Thanks for UR Help & site. I am going to try it with two layers of batting & NO glue, just pins.
What kind of glue are you using? Are you using a basting spray? I have used June Taylor spray in the past and now use 505 spray. I do not have gumming issues with either. If you need to, just use the layer of insul-bright without the batting.
A walking foot will help if you are getting small stitches. But first, make sure you are using the right spray.
I was using Dritz basting spray, but as I look at directions again, I might of sprayed to close. It says 12 inches, I was probably 6. Thanks for answering my question, I love UR work.
I love the project, but my sewing machine repair tech said not to use the spray adhesive as it gums up the sewing machine. I would try basting instead or a lot of pins. Thanks for the project idea.
Thank you for the great ideas!! Wonderful gift for bridal shower!! Made a set of placemats to match.
Love the colors you used. Great idea using the back fabric as the binding, however,just a little helpful advice. You didn’t make it clear about using bottom for binding, you said to fold the binding 1.5″ binding in half and it was confusing because you photographed on black dotted fabric also. I plan to make several, and thank you for sharing the names of your batting so I could just click and order at amazon.
Sorry, the black dotted fabric is my ironing board cover 🙂
When you sewed the binding down did you also use the walking foot?
Yes, I use the walking foot on the whole thing. I use my seam ripper or a pair of small scissors to hold the fabric in place as I go. I use the inside part of the left side of the walking foot as my guide (does that make sense?). Those two things allow me to get a nice even top stitch.
Thank you for this awesome project! I bought some clearance Fall Themed fabric and mixed and match to make a set for my mom’s birthday. She loves to entertain and decorate for all the holidays. She will love these on her buffet! Such a great project to make in large quantities, assembly line style. Look out family and friends…you’re getting these as gifts!
These look wonderful!!.. Thankyou for the clear instructions.
Will it take a hit casserole dish just out of the oven without marking my table?😬
It should be able to. The insul bright inside will reflect heat.
This is a GREAT tutorial! I believe that my grandkids could follow this and be successful. It’s such a good idea, I wonder why I’ve never seen it before. Thank you, I love this site.
Love them is every corner on the biding cut
Yes, you will cut a rectangle out of all four corners to help minimize the bulk. You can skip this step if you wish.
Is there a way to print the instruction? I don’t see a “print” button
Hi Sue, I have made a printer friendly pdf pattern available for purchase in my etsy store. https://www.etsy.com/listing/465686310/extra-large-hot-pad-pdf-pattern
This was the first quilting project I have made and it turned out great. Thanks for the help!
Would you please make these with a friendly printer option?
Hi Donna, I have made a printer friendly pdf pattern available for purchase in my etsy store. https://www.etsy.com/listing/465686310/extra-large-hot-pad-pdf-pattern
Do you have to use a walking foot to make this?
With thick batting, the fabric will move without it. If your batting is too thin, it won’t keep the heat off your counter. So, I guess, if you don’t have a walking foot, use a single layer of Insul-bright since it will be more effective at reflecting heat than batting.
Hi.I’m so happy to find your blog and this project on Pinterest. Just want to personally thank you and let you know that I featured this project on my blog in my “Super Sewing Projects Just Right for Beginners” post.
Here it is,http://sewingmadesimple.net/beginners-sewing-projects/
Please let me know if I missed something or if you want to change and add information about your blog and project.
Xoxo,
Amber
P.s. Love your branding! I’m a new fan. 🙂
Thanks for the feature Amber!
Where do you buy the little clips you used to hold your fabric together?
Hi Denice. I bought my clips on Amazon. They are Wonder Clips made by Clover. I use them for all of my quilting projects. http://amzn.to/2dAhxeA
I needed these so made one from my head. Took forever and did not look great. So I found your tutorial and followed it. Very easy and looks great thanks to you! Appreciate your help!
I have made several of these hot pads. However, I marked the stitching line for the outside stitching at 1.5″ from the cut edge. From the photo of the finished hot pad, there is more than .25″ between the binding and the first row of stitching. Marking as specified in the pattern at 1″ would leave on .25″ (i.e. 1.0″ – .75″ binding). Although, it doesn’t change the functionality of the item, I think it looks better marking the first box 1.5″ from the cut edge.
Judy C.
P.S. I am making some for my daughter, Emily, for Christmas
Thanks for the tip Judy!
Thanks for this great tutorial! Your tips are really helpful and I just finished my first large hotpad. Can’t wait to put it to use on our family dinner table. I plan to make more for gifts.
Great tutorial, was very easy to follow. Was able to find material almost exactly. Just added a couple of inches to the top and bottom on the second one for a bigger casserole dish I have. Thanks for posting.
Hi,
Can you use just the plain “silvertex” ironing board fabric instead of
Insulbright?
thanks,
ellen.kelley@cox.net
Ellen, I think that would probably show through the cotton fabric that goes on top. If you used a dark fabric, maybe you could quilt the cotton to the silvertex so it has the same diamond pattern, then sew the back/binding on. Otherwise, you might notice the quilting underneath the cotton. Let me know if you give it a try.
i have just printed this because i want to make some but i had 10 pages of nothing but comments. what a waste of paper. could not get the printable one to work. but the hot pad is wonderful thank you
Carolyn, there is a printable pdf pattern available for purchase in my etsy store for $4. http://Www.etsy.com/shop/auntieemscrafts
Did you blind stitch the mitered corners ? It doesn’t look like it, and you didn’t mention it . Not my favorite to do.
No I do not.
Nice tutorial and a nice project. Insulbrite is meant for high temperatures, and I can see from your excellent photos that you used a cotton batt, but you don’t warn not to use a polyester batt. I wonder if anyone new to quilting made them with poly. Thanks for sharing. 🙂
.
Wonderful idea for Christmas gifts! The bakers in my family love the different fabric I use depending on the occasion! Thank you for the easy to follow instructions that a novice can follow!
This is very nice as the directions. But I would never spray a chemical in the layers just to hold batting together in something that is having hundreds of degrees of heat applied to when your food comes out of the oven. Pins/clips would work just fine for something made to be used near and around food.
I can’t find Insulbrite locally. What type of batting is safe to use? Thanks.
Amanda, you can use any 100% cotton batting. You can always double the layers if you want it thicker.
I did not spray, just pinned, love the way they turned out. Made 2 and will gift one.
I have made two of the hot pads and the second definitely turned out better than the first. My issue is the backing seems to move when doing the quilting part and the whole pad ends up looking crooked when completed. I spray all layers with 505 fabric adhesive and use a walking foot. Any suggestions?
Thank you for a great tutorial. Just love these large hot pads!
Elaine. they should not be shifting if you use a walking foot. Are you able to adjust the presser foot pressure on your machine? If so, maybe adjust that. I only use the 505 spray to hold mine when using a walking foot, but my mom uses pins as well. Maybe give that a try.
I loved these hot pads. I made so many for Christmas presents and presented them with a new baking dish. Your miter corner technique was the best thing I ever came across. I nailed those points perfectly. I also enjoy the look of the rectangle quilting. Looks beautiful. Thanks for sharing your technique.
Hi Emily, I can’t find Insulbrite locally.
Can I use 1/2″ foam along with the batting for the insulation instead?
I would use a second layer of cotton batting if you cannot find the InsulBright.